はじめに
GLB事業部Lakehouse部の阿部です。
本記事では、Databricksのデモページのdbdemosを参考にしたチャットボットの改良方法について解説します。
改良方法として、LangChainのmemory機能と翻訳アプリケーションを用いて改良しております。
こちらは改良前の前回の記事です。
dbdemosのセットアップを含めた質問データセットの準備からベクトルデータベース作成までの記事は以下となります。
本記事は、dmdemosにある以下のノートブックを参考にしています。
04-Q&A-promt-engineering-dolly
日本語に対応したchat botを構築する上で、こちらの書籍も参考にさせていただきました。
Databricksの詰め合わせ! - 今、気になっている機能を深掘りしてみました-
Databricks Japanの方々が著者となっており、基本的な話から実案件に使える応用テクニックまで大変勉強になりました。
公式のdbdemosのページでは英語の回答に対して英語で回答するチャットボットですが、本記事では日本語対応したチャットbotを構築します。
目次
- はじめに
- 目次
- LangChainのmemoryとは
- デモの概要
- 前準備
- memory機能を用いたプロンプトエンジニアリング
- チャットボットのクラスを定義
- 日本語翻訳の前準備
- 英語を日本語に翻訳
- デモを終えた感想
- おわりに
LangChainのmemoryとは
デモの内容に入る前にLangChainのmemoryの機能について解説します。
memoryとは、ユーザーとLLMの過去の対話履歴を記憶するクラスの総称です。
過去の対話履歴を記憶して現在の対話にcontextとして挿入することで、LLMは過去の対話を考慮した回答ができます。
Memoryの使用には大きく分けて2つの方法があり、それらの方法を紹介してデモの中身に入りたいと思います。
ChatMessageHistory
ChatMessageHistoryとは、人間とLLMとのChat履歴を管理する機能です。
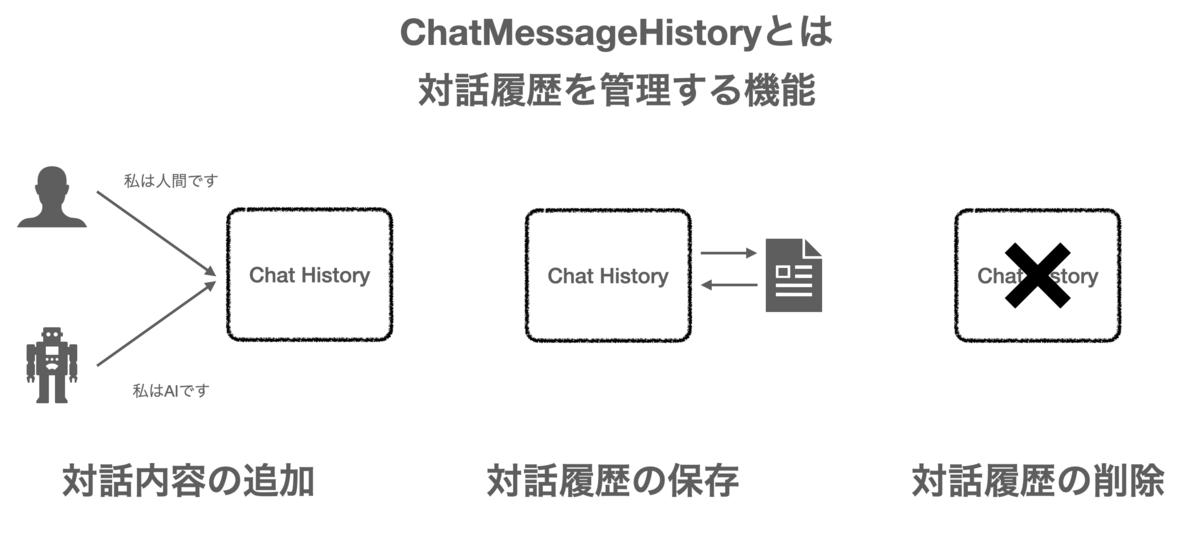
Chatの履歴に会話の追加や削除といった操作が可能です。
LangChainの公式ドキュメントのソースコードを参照して紹介します。
from langchain.memory import ChatMessageHistory

history = ChatMessageHistory()

history.add_user_message("hi!")

history.add_ai_message("whats up?")

history.messages
実行結果を表示します。
Out[5]: [HumanMessage(content='こんにちは!私の名前はKenです', additional_kwargs={}, example=False),
AIMessage(content='初めまして、私の名前はBobです', additional_kwargs={}, example=False)]
対話履歴も削除できます。
history.clear()
history.messages
Out[9]: []
このように、対話履歴に対するメッセージの追加や削除が可能です。
ConversationBufferMemory
ConversationBufferMemoryとは、過去の対話履歴を記憶することで次の対話に転用する機能です。 本デモで扱うmemoryの機能ですが、以下に例を示します。
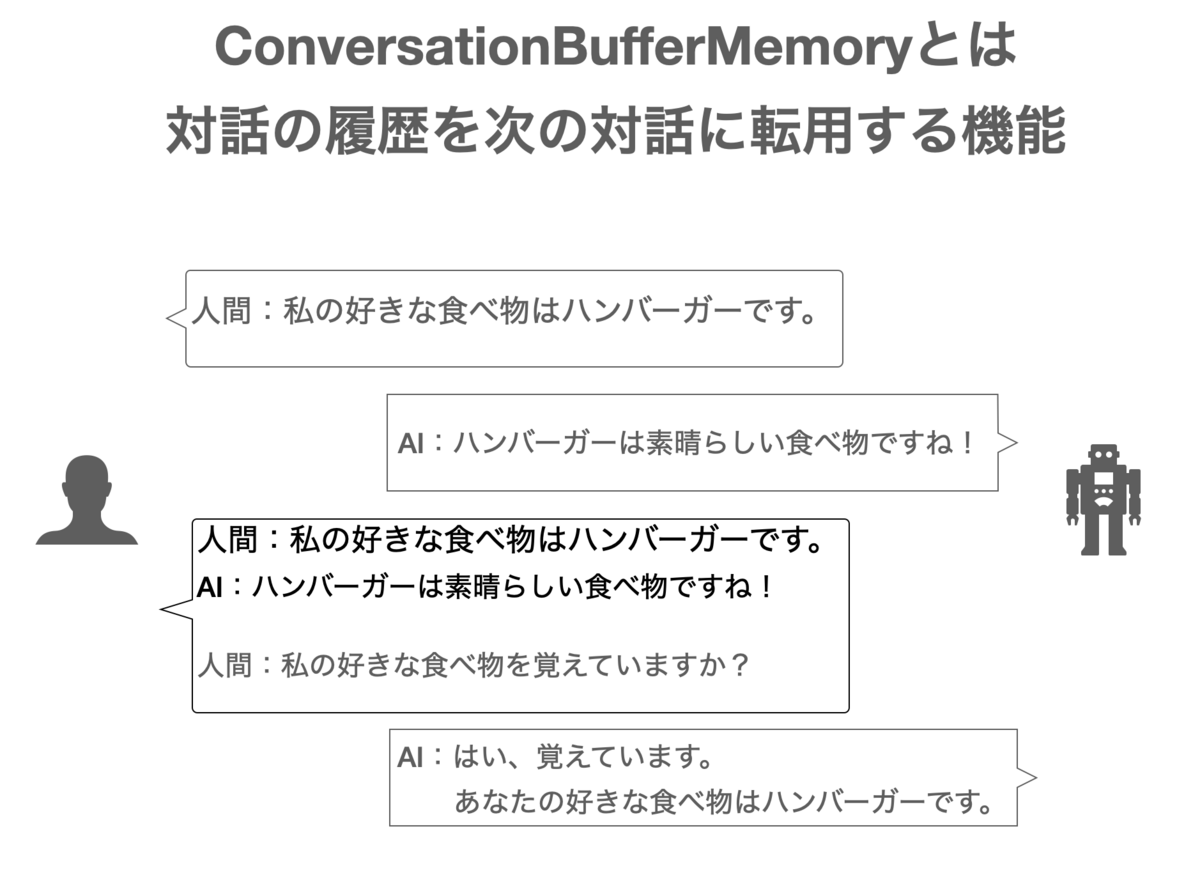
対話が進んでも記憶した対話履歴をプロンプトにcontextとして挿入することで、過去の対話履歴を基に回答が可能です。
ConversationBufferMemoryの使用例として、LangChainの公式ドキュメントのコードを示します。
from langchain.memory import ConversationBufferMemory

memory = ConversationBufferMemory()
memory.chat_memory.add_user_message("hi!")
memory.chat_memory.add_ai_message("whats up?")

memory.load_memory_variables({})
読み込んだ対話履歴を表示します。
{'history': 'Human: hi!\nAI: whats up?'}
こちらは会話がひとつずつであるため対話履歴を元にした会話をしておりませんが、デモの中では実際にmemory機能を使った回答をお見せします。
具体的には、ConversationBufferMemoryをChainとして使用し、プロンプトのcontextに挿入する形で使用します。
デモの概要
前回のデモで作成したQ&Aチャットbotの改良をします。
改良点としては、以下の2つです。
ConversationBufferMemoryを使用して過去の対話履歴をcontextとして挿入することで、LLMが過去の対話を参考にして回答できるようにします。日本語に対応できるように翻訳アプリケーションを使用し、日本語の質問に対して日本語で回答してくれる様にしました。
ちなみに、クラスターはdbdemosのセットアップ時に作成されたものを使用しております。
- Databricks Runtime Version: 13.0 ML
- Node type: StandardStandard_NC8as_T4_v3(56 GB Memory, 1 GPU)
前準備
以下3つの前準備を実施します。(前回の記事と同じです)
- Pythonライブラリのインストール
- カタログとDBのセットアップ
- Hembeddingモデルの読み込み、作成済みChoromadb(ベクトルデータベース)の読み込み
Pythonライブラリのインストール
%pip install -U transformers langchain chromadb accelerate bitsandbytes
カタログとDBのセットアップ
%run ./_resources/00-init $catalog=hive_metastore $db=dbdemos_llm
Hembeddingモデルの読み込み、作成済みChoromadb(ベクトルデータベース)の読み込み
if len(get_available_gpus()) == 0:
  Exception("Running dolly without GPU will be slow. We recommend you switch to a Single Node cluster with at least 1 GPU to properly run this demo.")

from langchain.embeddings import HuggingFaceEmbeddings
from langchain.vectorstores import Chroma

gardening_vector_db_path = "/dbfs"+demo_path+"/vector_db"
hf_embed = HuggingFaceEmbeddings(model_name="sentence-transformers/all-mpnet-base-v2")
chroma_db = Chroma(collection_name="gardening_docs", embedding_function=hf_embed, persist_directory=gardening_vector_db_path)
準備が整ったところでmemoryを用いたプロンプトエンジニアリングの部分を見ていきましょう。
memory機能を用いたプロンプトエンジニアリング
プロンプトのテンプレートに以下3つの変数を指定することで、プロンプトにベクトル検索による類似文書と対話履歴を挿入しています。
-context: ベクトル検索から得られた類似文書
- human_input: 過去の人間の質問
- chat_history: 過去の対話履歴
実装したコードは以下となります。
import torch
from transformers import AutoTokenizer, AutoModelForCausalLM, pipeline, AutoModelForSeq2SeqLM
from langchain import PromptTemplate
from langchain.llms import HuggingFacePipeline
from langchain.chains.question_answering import load_qa_chain
from langchain.memory import ConversationSummaryBufferMemory

def build_qa_chain():
  torch.cuda.empty_cache()
  # Defining our prompt content.
  # langchain will load our similar documents as {context}
  template = """You are a chatbot having a conversation with a human. Your are asked to answer gardening questions and help cultivating plants.
  Given the following extracted parts of a long document and a question, answer the user question. If you don't know, say that you do not know.

  {context}

  {chat_history}

  {human_input}

  Response:
  """
  prompt = PromptTemplate(input_variables=['context', 'human_input', 'chat_history'], template=template)

  # max_new_tokens を大きくすると、より長い応答が得られます。
  model_name = "databricks/dolly-v2-7b" # can use dolly-v2-3b, dolly-v2-7b or dolly-v2-12b for smaller model and faster inferences.
  instruct_pipeline = pipeline(model=model_name, torch_dtype=torch.bfloat16, trust_remote_code=True, device_map="auto",
                               return_full_text=True, max_new_tokens=256, top_p=0.95, top_k=50)
  hf_pipe = HuggingFacePipeline(pipeline=instruct_pipeline)

  # 対話履歴を要約する
  summarize_model = AutoModelForSeq2SeqLM.from_pretrained("facebook/bart-large-cnn", device_map="auto", torch_dtype=torch.bfloat16, trust_remote_code=True)
  summarize_tokenizer = AutoTokenizer.from_pretrained("facebook/bart-large-cnn", padding_side="left")
  pipe_summary = pipeline("summarization", model=summarize_model, tokenizer=summarize_tokenizer)

  # langchainパイプラインはまだ要約をサポートしていないので、付属のノートブック_resources/00-initに一時的な修正として追加しました。
  hf_summary = HuggingFacePipeline_WithSummarization(pipeline=pipe_summary)

  #500トークンを保持し、その後要約を要求します。特定のチャットの接頭辞についてモデルが訓練されていないため、混乱する可能性があるため、接頭辞を削除しています。
  memory = ConversationSummaryBufferMemory(llm=hf_summary, memory_key="chat_history", input_key="human_input", max_token_limit=500, human_prefix = "", ai_prefix = "")

  # Set verbose=True to see the full prompt:
  print("loading chain, this can take some time...")
  return load_qa_chain(llm=hf_pipe, chain_type="stuff", prompt=prompt, verbose=True, memory=memory)
対話履歴をそのままcontextに挿入すると徐々に文章が長くなり読み込めないため、要約モデルによって対話履歴を要約する処理を加えています。
その後、ConversationSummaryBufferMemoryを用いて{chat_history}と{human_input}をキーとしてmemory機能を実装しています。
チャットボットのクラスを定義
質問に回答のソース付きで回答するクラスを定義します。
class ChatBot():
  def __init__(self, db):
    self.reset_context()
    self.db = db

  def reset_context(self):
    self.sources = []
    self.discussion = []
    # Building the chain will load Dolly and can take some time depending on the model size and your GPU
    self.qa_chain = build_qa_chain()

  def get_similar_docs(self, question, similar_doc_count):
    return self.db.similarity_search(question, k=similar_doc_count)

  def chat(self, question):
    # Keep the last 3 discussion to search similar content
    self.discussion.append(question)
    similar_docs = self.get_similar_docs(" \n".join(self.discussion[-3:]), similar_doc_count=2)
    # Remove similar doc if they're already in the last questions (as it's already in the history)
    similar_docs = [doc for doc in similar_docs if doc.metadata['source'] not in self.sources[-3:]]
    return self.qa_chain({"input_documents": similar_docs, "human_input": question})

chat_bot = ChatBot(chroma_db)
日本語翻訳の前準備
翻訳アプリケーションの認証キーを取得し、Databricksのノートブックから呼び出せる様にします。
DeepL APIの認証キーを取得
翻訳にはDeepLのAPIを使います。
DeepLにはFreeプランが用意されており、1か月に50万文字まで無料です。
LLMで使用するにはDeepLの認証キーを取得する必要があり、こちらの記事を参考にして認証キーを取得しました。
DeepL翻訳の無料版APIキーの登録発行手順!世界一のAI翻訳サービスをAPI利用 | AutoWorker〜Google Apps Script(GAS)とSikuliで始める業務改善入門
シークレットの作成
認証キーはシークレットのため、ノートブックに直接記載するのはNGです。
認証キーを取得後、Databricks Secretsを使用してワークスペースに登録することで、認証キーをノートブックから呼び出せる様にします。
そのためにターミナルを起動後、Azure Databricks CLIをインストールします。
pip install databricks-cli
CLIは、Databricksホストとトークンを使用して設定します。
以下のコマンドを使用して設定できます。
databricks configure --token
シークレットスコープを作成します。
databricks secrets create-scope --scope <scope-name>
# databricks secrets create-scope --scope dbdemos_dolly_chat
<scope-name>には作成したいスコープ名を入力します。
シークレットキーをスコープに追加します。
databricks secrets put --scope <scope-name> --key <key-name>
<key-name>には登録する認証キーの名前を入力します。
実行すると、以下の画面が表示されます。
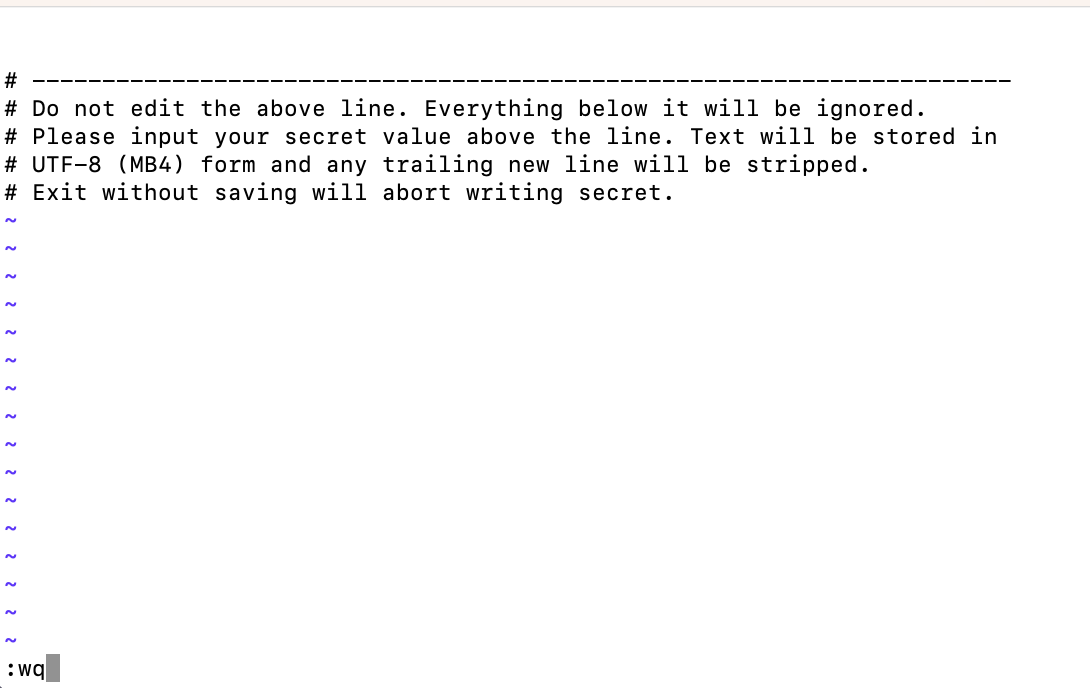
画面の上側には登録するシークレットキーを入力します。
今回はDeeplの認証キーを入力後、:wqと入力して内容を保存して終了します。
以上でDatabricksのノートブックからDeepLの認証キーを呼び出して使用できます。
英語を日本語に翻訳
DeepL API KEY用の認証キーを呼び出し、日本語に対応したchat botを構築します。
deeplライブラリをインストールし、dbutilsを用いて認証キーを取得します。
pip install deepl
# DeepL API key用のSecret(認証キー)を呼び出す。第一引数にはスコープ名、第二引数には認証キーの名前を指定
API_KEY = dbutils.secrets.get("dbdemos_dolly_chat","deepl_key")
translator = deepl.Translator(API_KEY)
日本語に対応したchat bot出力までの流れを確認します。
ベクトルデータベースには英語のQ&Aが保管されていることを思い出し、日本語の質問に対して日本語で返す手順は以下となります。
- 入力された日本語の質問を英語に変換
- chat botに英語で問い合わせて、質問との類似文書と問い合わせ結果を出力
- 類似文書と問い合わせ結果を日本語に変換
上記の流れを実装したコードになります。
import deepl
from bs4 import BeautifulSoup

# DeepL API key用のSecret呼び出し
API_KEY = dbutils.secrets.get("dbdemos_dolly_chat","deepl_key")
translator = deepl.Translator(API_KEY)

# 日本語 -> 英語
def input_trans(text):
  source_lang = 'JA'
  target_lang = 'EN-GB'
  results = translator.translate_text(text, source_lang=source_lang, target_lang=target_lang)
  return results.text

# 英語 -> 日本語
def output_trans(text):
    source_lang = 'EN'
    target_lang = 'JA'
    outputs = translator.translate_text(text, source_lang=source_lang, target_lang=target_lang)
    return outputs.text

def chat_ja(text):
  # 日本語質問を英語に変換
  en_input = input_trans(text)

  # Chatbotへ問い合わせ
  result = chat_bot.chat(en_input)
  en_answer = result['output_text'].capitalize()

  # 問い合わせ結果を日本語に変換
  ja_answer = output_trans(en_answer)

  # display in html
  result_html = f"<p><blockquote style=\"font-size:24\">{text}</blockquote></p>"
  result_html += f"<p><blockquote style=\"font-size:18px\">{ja_answer}</blockquote></p>"
  result_html += "<p><hr/></p>"
  result_html += "<center><p>参考にした類似コンテンツ</p></center>"
  result_html += "<p><hr/></p>"
  sources = []
  for d in result["input_documents"]:
    source_id = d.metadata["source"]
    sources.append(source_id)
    # Chromadb内のソースも翻訳
    page_contents = BeautifulSoup(d.page_content).text
    ja_contents = output_trans(page_contents)
    result_html += f"<p><blockquote>{ja_contents}<br/>(Source: <a href=\"https://gardening.stackexchange.com/a/{source_id}\">{source_id}</a>)</blockquote></p>"
  displayHTML(result_html)
chat botに問い合わせてみます。
chat_ja("ブルーベリーを育てるのに最適な土は?")
実行結果を表示します。
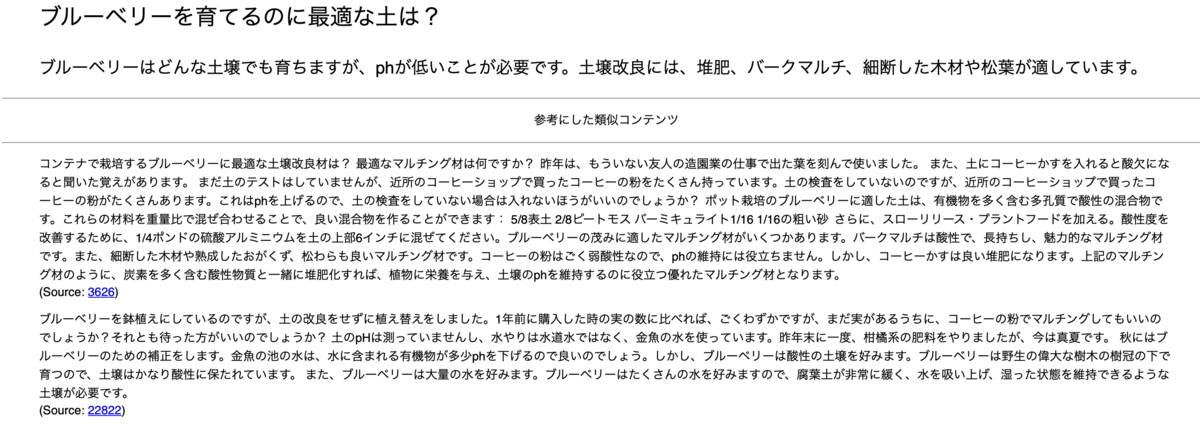
類似文書と回答結果が日本語に翻訳されていることがわかります。
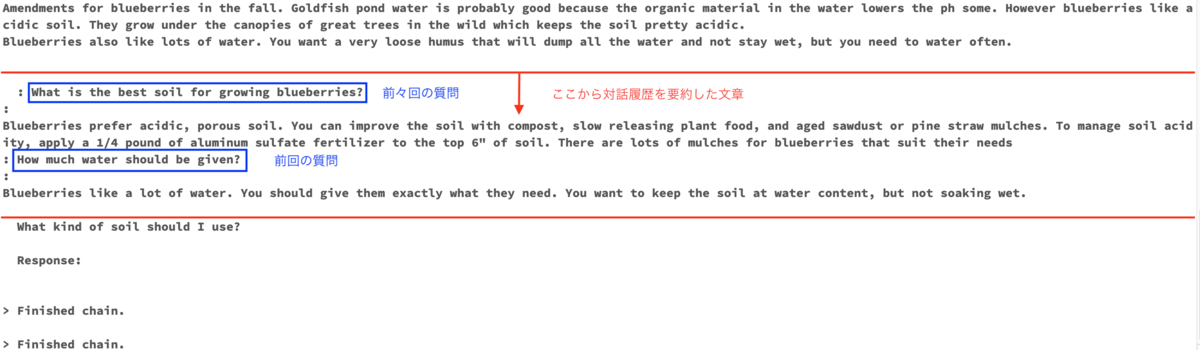
他の質問をしてmemoryが機能しているか確認します。
chat_ja("水はどのくらい与えればいいのでしょうか?")
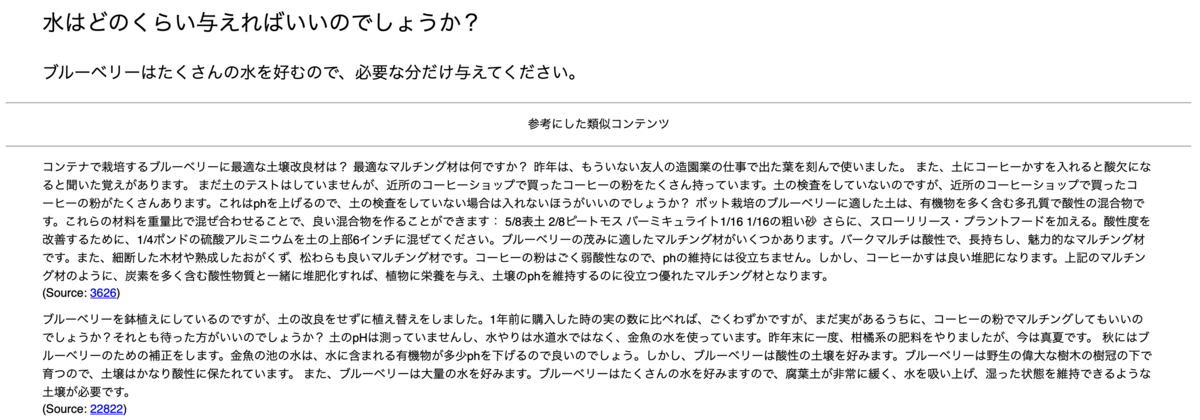
水を与えるものを言及しておりませんが、前回の対話履歴からブルーベリーであると認識しています。
プロンプトの中身も確認します。
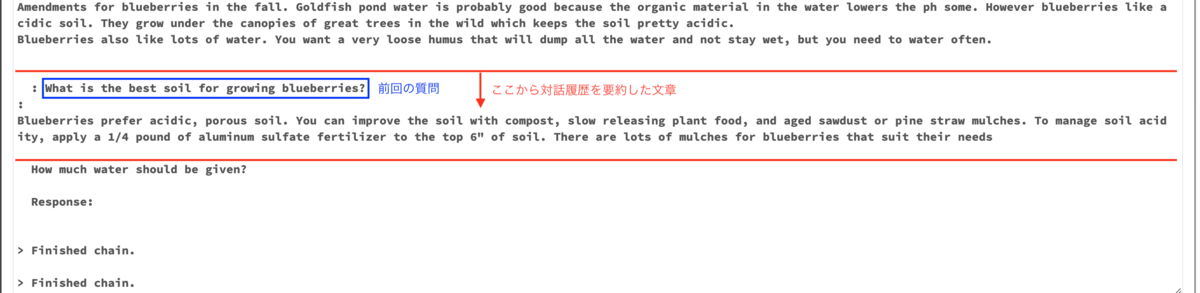
プロンプトからも前回の対話履歴を記憶していることがわかります。
追加の質問として、最初の質問と聞き方を変えて少々抽象的な質問をします。
chat_ja("どんな土壌にすればいい?")
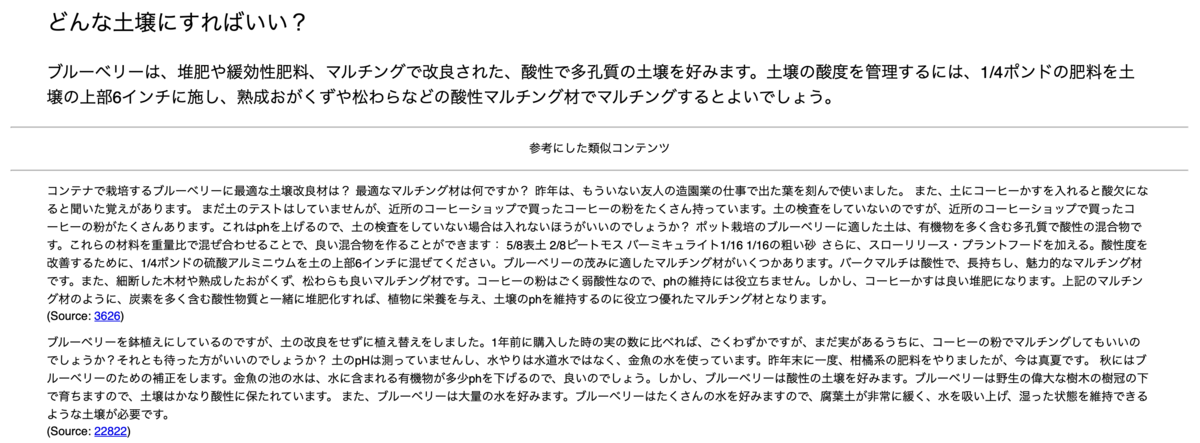
抽象的な質問に対してもブルーベリーに適した土壌について回答してくれています。
先ほどと同様にプロンプトの中身も確認します。
前々回と前回の対話履歴を記憶できていることがわかります。
LangChainのmemory機能を利用して、過去の対話を踏まえて回答するchat botを構築できました。
以上で、Dollyを使ったchat bot構築のデモは終了です。
デモを終えた感想
LLMシステムの基本的かつ代表的な構造を理解できました。
Dollyに限らず、ベクトル検索によるLLMシステムを構築する場合は本デモをベースにできると思います。
LLMの入門として他に考えられるTo doについて挙げてみました。
transformersの公式ドキュメントなどを参照して、詳しい機能を確認する。
ベクトルデータベースにはOSSかつローカル(Databricksk環境ではdbfs)で使用できるchromaを使用しましたが、クラウドネイティブのPineconeや他のベクトルデータベースも試す。
プロンプトエンジニアリングでは、前置きなしにクエリーを入力するzero-shot-promptingを使用しましたが、他の手法にも慣れる。(Few-shotやChain-of-Thoughtなど)
さまざまなAPIを試す。
Dolly以外のオープンなLLMも試す。
オープンソースのLLMはHugging Faceなどから定期的にリリースされている。
おわりに
本記事では、DeepLのAPIを使用して日本語に対応したchat botを構築できました。
本デモに関する記事は最後となりますが、LLM入門の入り口になれば幸いです。
最後までご覧いただきありがとうございます。
私たちはDatabricksを用いたデータ分析基盤の導入から内製化支援まで幅広く支援をしております。
もしご興味がある方は、お問い合わせ頂ければ幸いです。
そして、一緒に働いていただける仲間も募集中です!
APCにご興味がある方の連絡をお待ちしております。