
はじめに
こんにちは、ACS事業部の安藤です。
この記事は エーピーコミュニケーションズAdvent Calendar 2023の14日目の投稿です。
すでに成熟しつつあるTerraformですが、ここ半年ほどimportブロックやmovedブロック、 terraform test コマンドなど新機能をリリースしており、我々もアップデートに注目しています。
そんなTerraformですが、先日v1.7.0のbeta1がリリースされました。
※ 昨日v1.7.0-beta2もリリースされました。
注目ポイントとしては、やはり新機能のremovedブロックになるでしょうか。
元々 terraform state rm コマンドで対応したものが正式にHCLで書けるようになることで、.tfのコード内で削除アクションを完結させられるようになったのが強みだと思います。
CI/CDパイプラインやTerraform CloudのワークフローでもApply以外の余計なアクションをしないでリソース単位の削除がやりやすくなりました。
ちなみに私は該当リソース部分をまとめてコメントアウトしたり削除して擬似的に対応していましたが、お作法に乗っ取ることでコード管理としても履歴や経緯が残しやすくなりそうです。
他にもv1.6.0に追加されたterraform test コマンドのアップデートなどもありますね。
そんな中、個人的には一度試したきりほとんど使ったことがなかった terraform graph コマンドにもおそらく久々のアップデートがありました。
terraform graph
now produces a simplified graph describing only relationships between resources by default, for consistency with the granularity of information returned by other commands that emphasize resources as the main interesting object type and de-emphasize the other "glue" objects that connect them.
文章からはイマイチ分かりにくかったので実際グラフを生成して確認したいと思います。
そもそもterraform graphって何?
terraform graphはtfファイルもしくはtfplanファイルを元にリソース間の関係をグラフで視覚的に出力してくれる機能になっています。
出力としてはテキストで、DOTと呼ばれるデータ記述言語の形式で出力されます。
有向/無向グラフやフローチャートなどを書ける言語ですね。
DOT言語そのままではテキストのままですので、GraphvizでSVGやPNGなどの画像ファイルに変換する方法がドキュメントに記載されています。
やってみる
準備
Graphvizのインストール
Graphvizのインストール方法は以下のページに記載されているので、環境にあったGraphvizをインストールしてください。
WSL(Ubuntu)ならaptでインストールできます。
sudo apt install graphviz
Terraform コードの作成
適当なTerraformのコードを用意します。
今回は、シンプルな割にはリソース種類が多く依存関係がハッキリしているVMを作っていきます。
地味にコードが長いので見たい方は以下のサンプルコードを展開してください。
サンプルコード
provider "azurerm" {
  features {
  }
}

resource "azurerm_resource_group" "rg" {
  location = "japaneast"
  name     = "example-rg"
}

# Create virtual network
resource "azurerm_virtual_network" "my_terraform_network" {
  name                = "example-vnet"
  address_space       = ["10.0.0.0/16"]
  location            = azurerm_resource_group.rg.location
  resource_group_name = azurerm_resource_group.rg.name
}

# Create subnet
resource "azurerm_subnet" "my_terraform_subnet" {
  name                 = "example-subnet"
  resource_group_name  = azurerm_resource_group.rg.name
  virtual_network_name = azurerm_virtual_network.my_terraform_network.name
  address_prefixes     = ["10.0.1.0/24"]
}

# Create public IPs
resource "azurerm_public_ip" "my_terraform_public_ip" {
  name                = "example-public-ip"
  location            = azurerm_resource_group.rg.location
  resource_group_name = azurerm_resource_group.rg.name
  allocation_method   = "Dynamic"
}

# Create Network Security Group and rules
resource "azurerm_network_security_group" "my_terraform_nsg" {
  name                = "example-nsg"
  location            = azurerm_resource_group.rg.location
  resource_group_name = azurerm_resource_group.rg.name

  security_rule {
    name                       = "RDP"
    priority                   = 1000
    direction                  = "Inbound"
    access                     = "Allow"
    protocol                   = "*"
    source_port_range          = "*"
    destination_port_range     = "3389"
    source_address_prefix      = "*"
    destination_address_prefix = "*"
  }
  security_rule {
    name                       = "web"
    priority                   = 1001
    direction                  = "Inbound"
    access                     = "Allow"
    protocol                   = "Tcp"
    source_port_range          = "*"
    destination_port_range     = "80"
    source_address_prefix      = "*"
    destination_address_prefix = "*"
  }
}

# Create network interface
resource "azurerm_network_interface" "my_terraform_nic" {
  name                = "example-nic"
  location            = azurerm_resource_group.rg.location
  resource_group_name = azurerm_resource_group.rg.name

  ip_configuration {
    name                          = "my_nic_configuration"
    subnet_id                     = azurerm_subnet.my_terraform_subnet.id
    private_ip_address_allocation = "Dynamic"
    public_ip_address_id          = azurerm_public_ip.my_terraform_public_ip.id
  }
}

# Connect the security group to the network interface
resource "azurerm_network_interface_security_group_association" "example" {
  network_interface_id      = azurerm_network_interface.my_terraform_nic.id
  network_security_group_id = azurerm_network_security_group.my_terraform_nsg.id
}

# Create storage account for boot diagnostics
resource "azurerm_storage_account" "my_storage_account" {
  name                     = "diagexample"
  location                 = azurerm_resource_group.rg.location
  resource_group_name      = azurerm_resource_group.rg.name
  account_tier             = "Standard"
  account_replication_type = "LRS"
}


# Create virtual machine
resource "azurerm_windows_virtual_machine" "main" {
  name                  = "example-vm"
  admin_username        = "azureuser"
  admin_password        = "P@ssword"
  location              = azurerm_resource_group.rg.location
  resource_group_name   = azurerm_resource_group.rg.name
  network_interface_ids = [azurerm_network_interface.my_terraform_nic.id]
  size                  = "Standard_DS1_v2"

  os_disk {
    name                 = "myOsDisk"
    caching              = "ReadWrite"
    storage_account_type = "Premium_LRS"
  }

  source_image_reference {
    publisher = "MicrosoftWindowsServer"
    offer     = "WindowsServer"
    sku       = "2022-datacenter-azure-edition"
    version   = "latest"
  }


  boot_diagnostics {
    storage_account_uri = azurerm_storage_account.my_storage_account.primary_blob_endpoint
  }
}
アップデート前のグラフを確認(v1.6.1)
まずはv1.6.1で従来のグラフはどうなるか見てみましょう。
$ tfenv use 1.6.1
Switching default version to v1.6.1
Default version (when not overridden by .terraform-version or TFENV_TERRAFORM_VERSION) is now: 1.6.1
planやapplyを実行する必要はありませんが、initは必要なので実行して、まずはgraphで出力される生のテキストを見てみましょう。
$ terraform init
$ terraform graph
digraph {
        compound = "true"
        newrank = "true"
        subgraph "root" {
                "[root] azurerm_network_interface.my_terraform_nic (expand)" [label = "azurerm_network_interface.my_terraform_nic", shape = "box"]
                "[root] azurerm_network_interface_security_group_association.example (expand)" [label = "azurerm_network_interface_security_group_association.example", shape = "box"]
                "[root] azurerm_network_security_group.my_terraform_nsg (expand)" [label = "azurerm_network_security_group.my_terraform_nsg", shape = "box"]
                "[root] azurerm_public_ip.my_terraform_public_ip (expand)" [label = "azurerm_public_ip.my_terraform_public_ip", shape = "box"]
                "[root] azurerm_resource_group.rg (expand)" [label = "azurerm_resource_group.rg", shape = "box"]
                "[root] azurerm_storage_account.my_storage_account (expand)" [label = "azurerm_storage_account.my_storage_account", shape = "box"]
                "[root] azurerm_subnet.my_terraform_subnet (expand)" [label = "azurerm_subnet.my_terraform_subnet", shape = "box"]
                "[root] azurerm_virtual_network.my_terraform_network (expand)" [label = "azurerm_virtual_network.my_terraform_network", shape = "box"]
                "[root] azurerm_windows_virtual_machine.main (expand)" [label = "azurerm_windows_virtual_machine.main", shape = "box"]
                "[root] provider[\"registry.terraform.io/hashicorp/azurerm\"]" [label = "provider[\"registry.terraform.io/hashicorp/azurerm\"]", shape = "diamond"]
                "[root] azurerm_network_interface.my_terraform_nic (expand)" -> "[root] azurerm_public_ip.my_terraform_public_ip (expand)"
                "[root] azurerm_network_interface.my_terraform_nic (expand)" -> "[root] azurerm_subnet.my_terraform_subnet (expand)"
                "[root] azurerm_network_interface_security_group_association.example (expand)" -> "[root] azurerm_network_interface.my_terraform_nic (expand)"
                "[root] azurerm_network_interface_security_group_association.example (expand)" -> "[root] azurerm_network_security_group.my_terraform_nsg (expand)"
                "[root] azurerm_network_security_group.my_terraform_nsg (expand)" -> "[root] azurerm_resource_group.rg (expand)"
                "[root] azurerm_public_ip.my_terraform_public_ip (expand)" -> "[root] azurerm_resource_group.rg (expand)"
                "[root] azurerm_resource_group.rg (expand)" -> "[root] provider[\"registry.terraform.io/hashicorp/azurerm\"]"
                "[root] azurerm_storage_account.my_storage_account (expand)" -> "[root] azurerm_resource_group.rg (expand)"
                "[root] azurerm_subnet.my_terraform_subnet (expand)" -> "[root] azurerm_virtual_network.my_terraform_network (expand)"
                "[root] azurerm_virtual_network.my_terraform_network (expand)" -> "[root] azurerm_resource_group.rg (expand)"
                "[root] azurerm_windows_virtual_machine.main (expand)" -> "[root] azurerm_network_interface.my_terraform_nic (expand)"
                "[root] azurerm_windows_virtual_machine.main (expand)" -> "[root] azurerm_storage_account.my_storage_account (expand)"
                "[root] provider[\"registry.terraform.io/hashicorp/azurerm\"] (close)" -> "[root] azurerm_network_interface_security_group_association.example (expand)"
                "[root] provider[\"registry.terraform.io/hashicorp/azurerm\"] (close)" -> "[root] azurerm_windows_virtual_machine.main (expand)"
                "[root] root" -> "[root] provider[\"registry.terraform.io/hashicorp/azurerm\"] (close)"
        }
}
こんな感じの情報が出てきました。矢印でいろんなリソースが繋がっていそうですが、既に30行にもなっているので人間には読み取りづらいですね。
早速画像ファイルに変換して画像を見てみましょう。
ちなみにdot -T のオプションで画像のファイル形式を指定してます。
$ terraform graph | dot -T png > graph_v1.6.1.png
するとこんな感じの画像が生成されました。
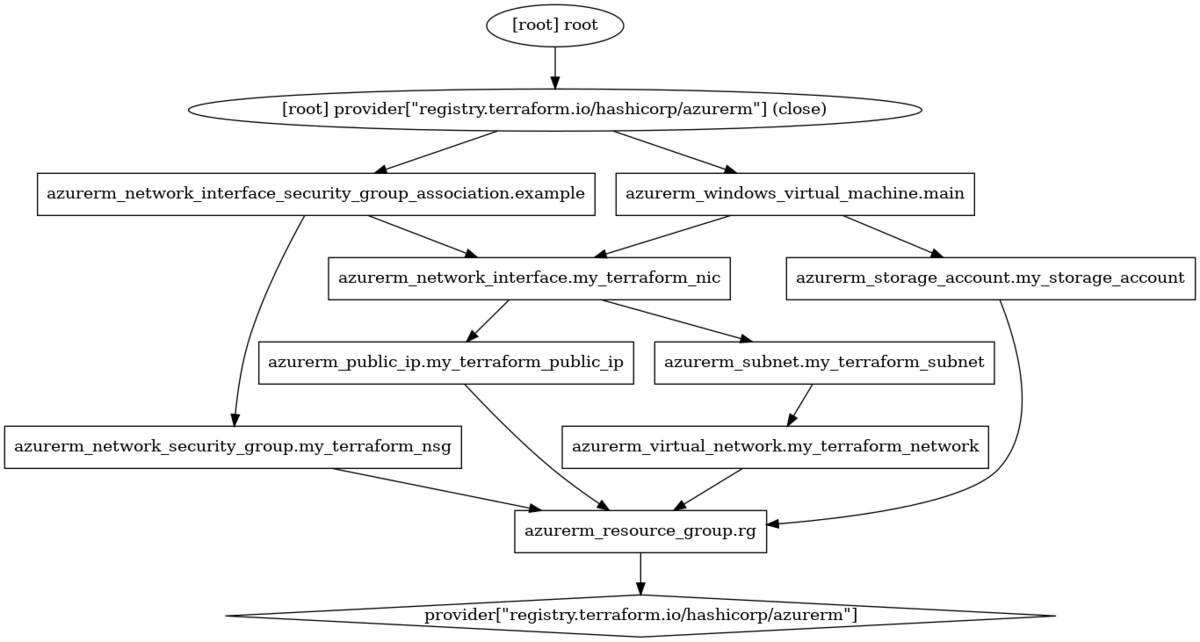
うーん・・・
構成をある程度知った上でよくよく読み解けば分からないでもないですが、パッと見で理解するのはだいぶしんどい、というか、
思ってたのと違う…みたいな感想になるんじゃないでしょうか?
こんな感じなので、terraform graph機能はあまり使われてこなかったんじゃないかと個人的には思っています。
もし活用されている方がいたらぜひ活用方法を教えてください。
とまあ既存のグラフ機能はこんなものにして、待望のアップデートされたグラフを見てみましょう。
1.7.0-beta1のグラフを見てみる
tfenvでバージョンを1.7.0-beta1に切り替えます。
$ tfenv use 1.7.0-beta1
Switching default version to v1.7.0-beta1
Default version (when not overridden by .terraform-version or TFENV_TERRAFORM_VERSION) is now: 1.7.0-beta1
$ terraform -v
Terraform v1.7.0-beta1
on linux_amd64
+ provider registry.terraform.io/hashicorp/azurerm v3.83.0
まずはDOTのテキストベースで見てみます。
$ terraform graph
digraph G {
  rankdir = "RL";
  node [shape = rect, fontname = "sans-serif"];
  "azurerm_network_interface.my_terraform_nic" [label="azurerm_network_interface.my_terraform_nic"];
  "azurerm_network_interface_security_group_association.example" [label="azurerm_network_interface_security_group_association.example"];
  "azurerm_network_security_group.my_terraform_nsg" [label="azurerm_network_security_group.my_terraform_nsg"];
  "azurerm_public_ip.my_terraform_public_ip" [label="azurerm_public_ip.my_terraform_public_ip"];
  "azurerm_resource_group.rg" [label="azurerm_resource_group.rg"];
  "azurerm_storage_account.my_storage_account" [label="azurerm_storage_account.my_storage_account"];
  "azurerm_subnet.my_terraform_subnet" [label="azurerm_subnet.my_terraform_subnet"];
  "azurerm_virtual_network.my_terraform_network" [label="azurerm_virtual_network.my_terraform_network"];
  "azurerm_windows_virtual_machine.main" [label="azurerm_windows_virtual_machine.main"];
  "azurerm_network_interface.my_terraform_nic" -> "azurerm_public_ip.my_terraform_public_ip";
  "azurerm_network_interface.my_terraform_nic" -> "azurerm_subnet.my_terraform_subnet";
  "azurerm_network_interface_security_group_association.example" -> "azurerm_network_interface.my_terraform_nic";
  "azurerm_network_interface_security_group_association.example" -> "azurerm_network_security_group.my_terraform_nsg";
  "azurerm_network_security_group.my_terraform_nsg" -> "azurerm_resource_group.rg";
  "azurerm_public_ip.my_terraform_public_ip" -> "azurerm_resource_group.rg";
  "azurerm_storage_account.my_storage_account" -> "azurerm_resource_group.rg";
  "azurerm_subnet.my_terraform_subnet" -> "azurerm_virtual_network.my_terraform_network";
  "azurerm_virtual_network.my_terraform_network" -> "azurerm_resource_group.rg";
  "azurerm_windows_virtual_machine.main" -> "azurerm_network_interface.my_terraform_nic";
  "azurerm_windows_virtual_machine.main" -> "azurerm_storage_account.my_storage_account";
}
少しコンパクトになっています。行数は31→24行に減って、各ノードに含まれていた [root]などの記述がなくなっていることがわかります。
では画像にしてみましょう。
$ terraform graph | dot -T png > graph_1.7.0.png

うーん・・・
若干スッキリした気がしますが、やたら横長に潰れたような感じになってやや見にくいですね…
テキストの方を見るとノードの情報の前のパラメータが変わっており、
2行目の rankdir = "RL"; というのがレイアウトの方向性をRL(Right to Left)にする、というパラメータが加わった影響のようでした。
デフォルトはv1.6.1の表示のようなTB(Top to Bottom)のようですので、ちょっとDOTの設定を弄って近い条件の絵を出力してみます。
するとこんな感じになりました。
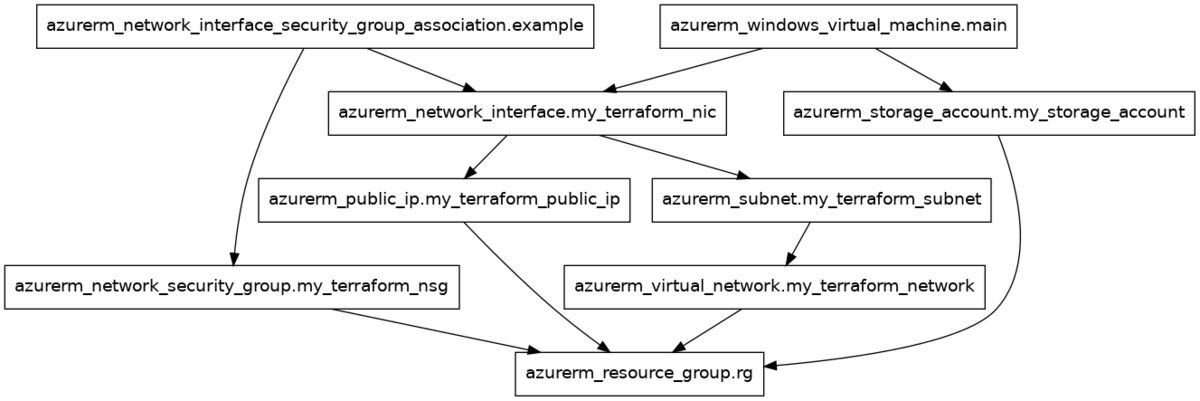
v1.6.1のような表示に戻りましたね!
また、これでどんな変更があったのかがわかりましたね。
グラフのトップにあったrootと上下段にあったproviderがなくなっていました。
そして・・・根本的なところはあまり変わっていないことがわかりました。。
まあ、まだ手を加えだした、ということで今後に期待、ということにしておきましょう。
代わりのイイ感じなTerraformの可視化方法はないの?
ハイ解散!となる前に、Terraformの可視化ツールをご紹介しましょう。
Pluralithというツール/サービスがまだα版のようですが、なかなかいい感じです。
Terraformを可視化するツールになっていて、コマンドバイナリを使ってローカル実行する方法とTerraform CloudやGitHub ActionsなどのCIに組み込む方法の2パターンの方法で利用できます。
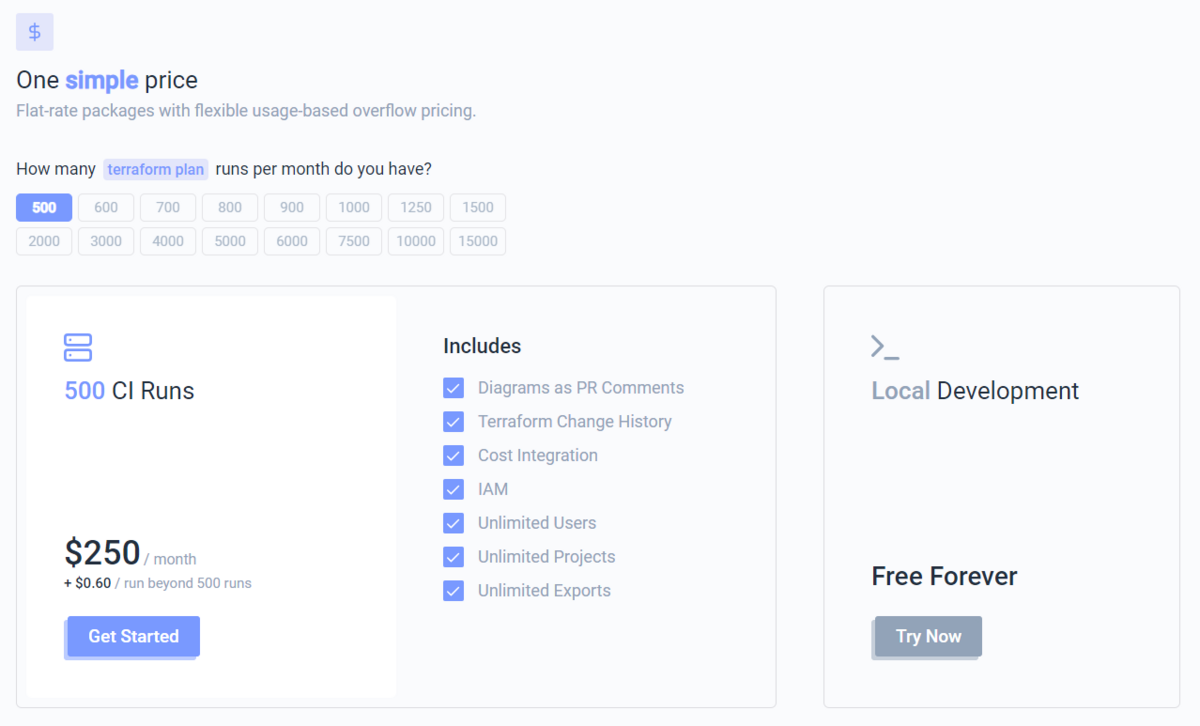
CIは実行回数に応じた料金設定がありますが、ローカル実行は永久無料とのことです。
ひとまずローカル実行でどんなグラフができるのか見てみたいと思います。
Pluralithのセットアップ
Pluralithのアカウント作成
ローカル実行であってもPluralithにアカウントを作る必要があります。
Get Startedをクリックするとアカウントをサインアップします。

Pluralithのコマンドインストール
アカウント認証が終わるとCI SetupとLocal Setupのガイドが出てくるので、Local SetupのTry Nowをクリックします。
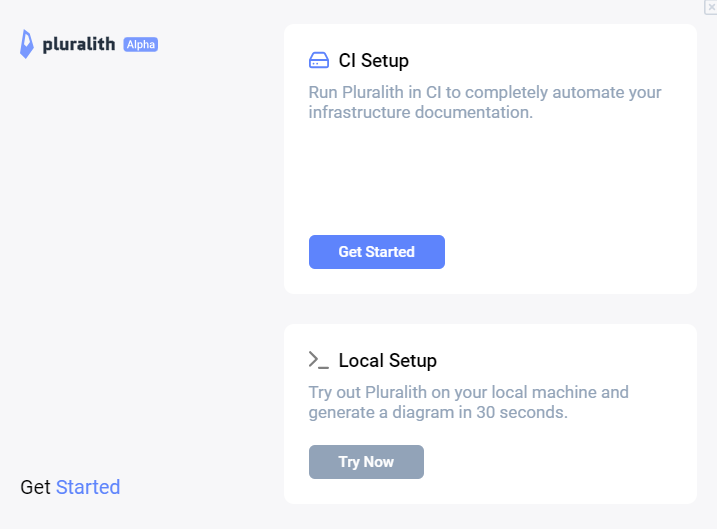
①Download CLIから環境に合わせたPluralithコマンドがインストールできます。

詳細な設定方法はこちら
PluralithのAPI Key取得
↑の②Loginに表示されているAPI Keyを取得します。
ローカルからPluralithに認証するのに利用されます。
Pluralithのローカル認証
セットアップの最後に、pluralith loginコマンドで先程取得したAPI Keyを渡して認証は完了です。
$ pluralith login --api-key ${api_key}

 _
|_)|    _ _ |._|_|_
|  ||_|| (_||| | | |

Welcome to Pluralith!

  ✔ API key is valid, you are authenticated!
Pluralithでグラフの作成
認証も済んだので早速グラフを作ってみましょう。 pluralith graph コマンドで作成できます。
$ pluralith graph
⠿ Initiating Graph ⇢ Posting Diagram To Pluralith Dashboard

→ Authentication
  ✔ API key is valid, you are authenticated!

→ Plan
  ✔ Local Execution Plan Generated
  ✔ Local Plan Cache Created
  ✔ Secrets Stripped
  ✔ Costs Calculated

→ Graph
  ✔ Local Diagram Generated
  ✔ Diagram Posted To Pluralith Dashboard

  → Diagram Pushed To: https://app.pluralith.com/#/orgs/******/projects/pluralith-local-project/runs/****/
10秒程度待つとURLが生成されるので開いてみると
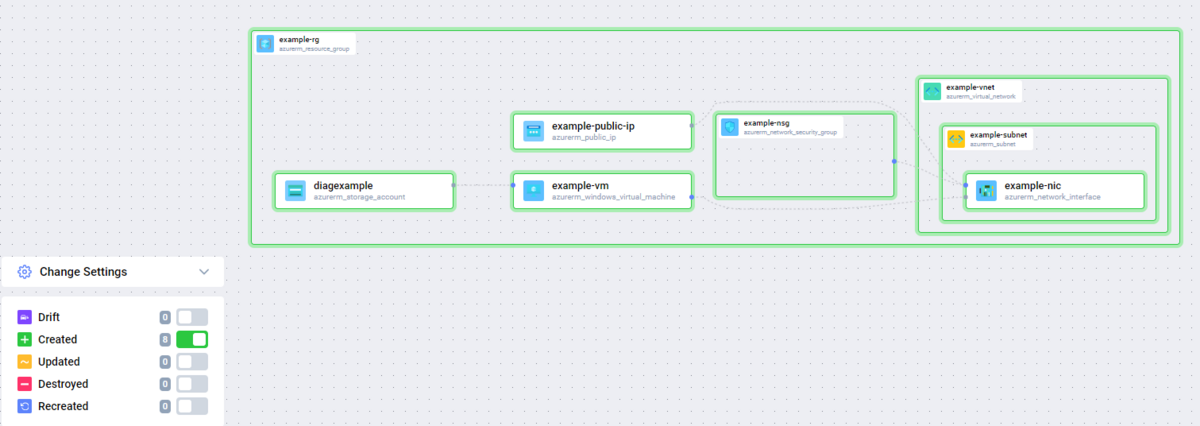
こんな感じでかなりイイ感じで描画してくれます!
Azureのアイコンを使って文字以外での情報があってわかりやすいですし、
リソースグループや仮想ネットワークなどが範囲を持つリソースとして階層構造になっていることがわかります。
また今回は全リソースが新規作成なので全て緑のCreatedとなっていますが、運用中であればどこが変更のある部分なのかまで色で判断できるのもいいですね。
ちなみにリソース単位ではなくグラフ全体ですが、マウスドラッグによる移動や拡大・縮小もできます。
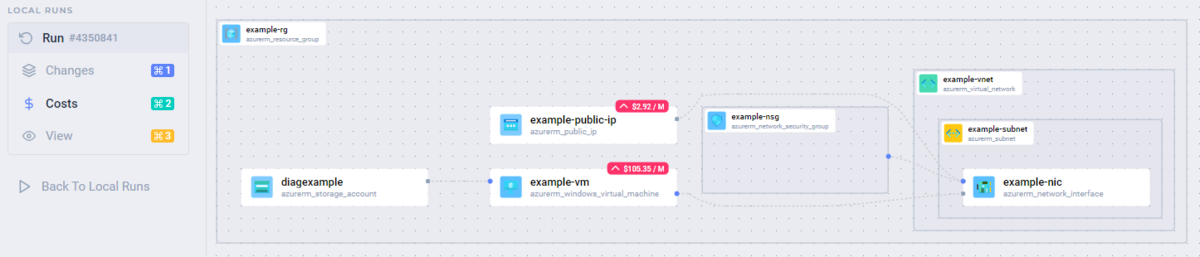
また、リソースをクリックするとリソースの金額(差分も)が出てきます。
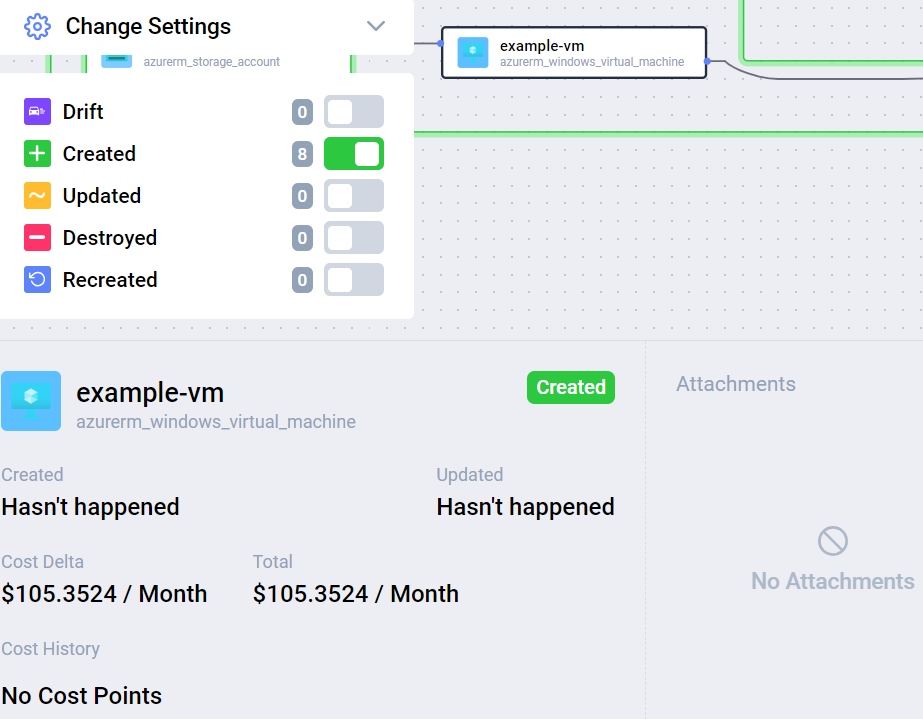
サイドメニューのCostをクリックすればどのリソースでコストが発生するかも分かりやすいですね。
サイドメニューの下にはエクスポートボタンがあり、PDF/PNGで出力することができます。

タイトルやバージョンなどある程度の情報を付与することも可能です。
個人的にはかなりイメージ通りのグラフ機能なんじゃないかと思ってます。

Pluralithでグラフのローカル作成
デフォルトではPluralithのWeb上でグラフを表示してくれますが、
初めからファイル形式がほしい場合などに--local-onlyオプションでローカルでファイルを作成することもできます。
$ pluralith graph --local-only
parsing response failed -> GetGitHubRelease: %!w(<nil>)
⠿ Initiating Graph ⇢ Posting Diagram To Pluralith Dashboard

→ Authentication
  ✔ API key is valid, you are authenticated!

→ Plan
  ✔ Local Execution Plan Generated
  ✔ Local Plan Cache Created
  ✔ Secrets Stripped
  ✔ Costs Calculated

→ Graph
  ✔ Local Diagram Generated
  → Diagram Exported To: /mnt/c/Users/*********/Pluralith_Diagram.pdf
Pluralith_Diagram.pdfがTerraformのディレクトリ内に作成されます。
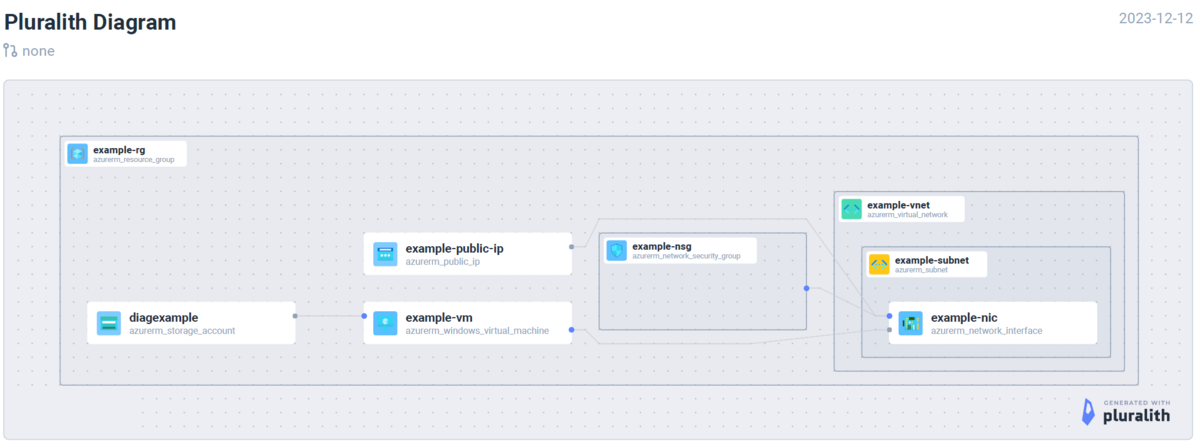
WebにあったコストやChange Settingの情報はなくなってしまいますが、たまにファイルベースで見る分には良いかもしれません。
(一応オプションを追加することでコスト等の情報も載せられるようですが、オプションによってはまだエラーになってしまうため、今回は割愛します)
またデフォルトのWebのグラフだとサービス側の仕様なのか、ファイルのサイズ制限があるようで失敗することがありましたが、local-onlyなら作成できるというケースもあったので、
ある程度規模の大きなTerraform構成の場合はlocal-onlyを試してみるとよいかと思います。
終わりに
terraform graphのアップデートにかこつけたPluralithの紹介になってしまいましたが、
インフラ構成の可視化は実際にかなりニーズのある機能なんじゃないかと感じています。
「先に絵(設計)があって、それに合わせてIaCを書く」というパターンも多いと思うので、
将来的にはAIなんかとも組み合わせて両方向できるようになってくれると嬉しいですね。
私達ACS事業部はAzure・AKSなどのクラウドネイティブ技術を活用した内製化のご支援をしております。
また、一緒に働いていただける仲間も募集中です!
今年もまだまだ組織規模拡大中なので、ご興味持っていただけましたらぜひお声がけください。