
Introduction
This is Abe from the Lakehouse Department of the GLB Division. In this article, I will explain how to test models created with dbt cloud. In the previous article, I explained the flow of connecting Databricks Lakehouse Platform to dbt Cloud using Partner Connect and converting data in Databricks on dbt Cloud.
[https://techblog.ap-com.co.jp/entry/2023/04/14/115124:embed:cite]
I would like to run the model tests against the entire pipeline created in the last article and finally check the tests I ran from the documentation site.
table of contents
- Introduction
- table of contents
- What is a test in dbt
- Before genetic test
- model test
- Reference article
- Conclusion
What is a test in dbt
dbt allows you to test various resources (Sources, Seeds, Snapshots) including models, and you should test all resources. There are three ways to test with dbt:
- Singular tests
- Genetic tests
- Load and test test modules from packages
Since there are many test modules, I will not introduce them in this article, but I would like to verify and introduce them in the future. Here, I will explain about Singular tests and Genetic tests respectively.
Singular tests
Singular tests are run when you want to write a SELECT statement and test it easily. Use a file for testing and put it under the directory specified in (usually the directory). ( Refer to the previous article for how to write the file).sqldbt_project.ymltest_pathstests
dbt_project.yml
Therefore, prepare file, tests, under the directory test_sample.sql and write the Singular test query.
For example, let's say we want to test if all dates in a column are older than the present stg_patient_allergies by looking at the model. to write a query that returns 0 records for Singular test.
Specifically, I will explain separately when the SIngular test fails and when it succeeds .start_date
An example of a query that fails the test is shown below.
select start_date
from {ref{stg_patient_allergies}}
where start_date < current_date
I wrote a query that uses a where clause to refer to records whose start_date is later than the current one. Since we are dealing with past time series data, the start_date should be earlier than the present.
Run the test by typing the test command in the console.
For the test command, dbt test --models stg_patient_allergies --select test_sample enter
models followed by the model name to test, select followed by .sql the file name.
I will do it.
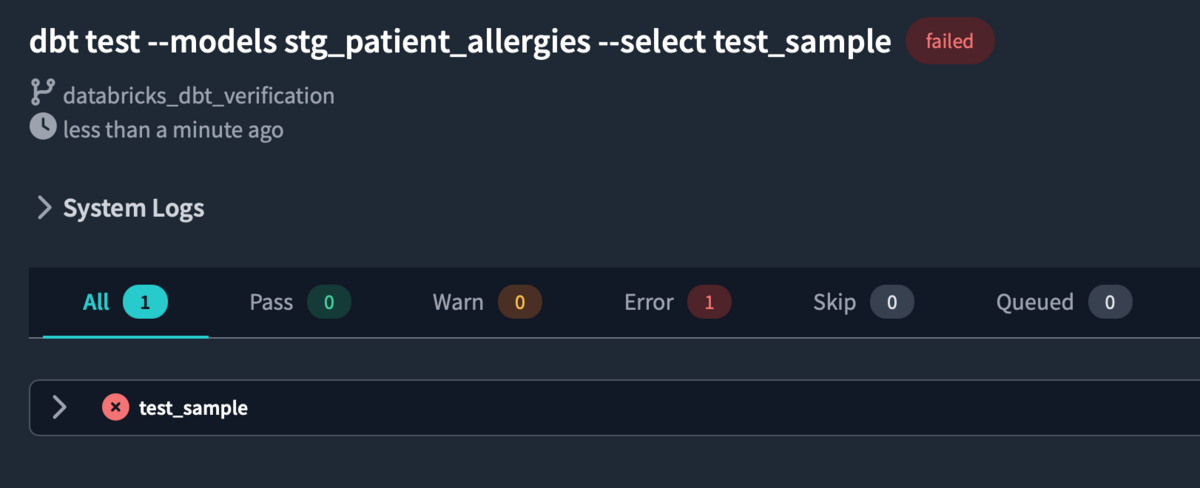
As you can see test_sample the test failed.
The reason is that the number of records does not become 0 under the specified where clause conditions.
Here is a successful query:
select start_date
from {ref{stg_patient_allergies}}
where start_date > current_date
It may look like the same query as before, but the only change is the direction of the inequality sign in the where clause. Preview and browse the table before test results.

As you can see from the image, the number of records extracted is 0.
Now run the test command to make sure the test succeeds.
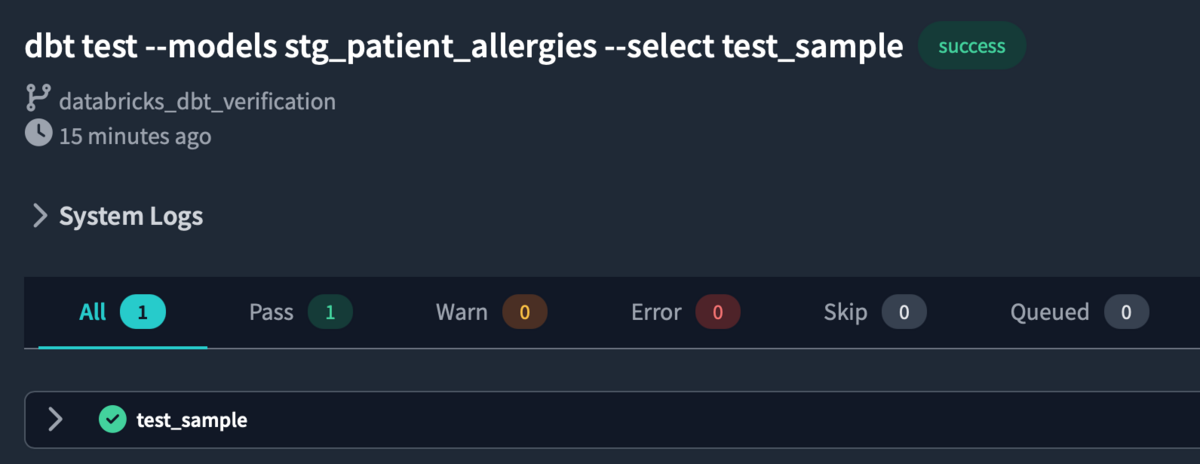
Test successful.
Here is a summary of situations where Singular tests are used.
- When you want to write a SELECT statement and test easily - When you want to customize the test because the target test is not prepared in Generic tests (described later) or in the package
Considering that models and columns change depending on the data to be handled, it is not versatile, so basically it is recommended to write when you want to test one model easily or ad hoc without using many.
Genetic tests
Unlike the Singular test, it is used for highly versatile tests that can be applied to many models.
The genetic tests prepared in advance are shown below.
unique: The specified column data must be uniquenot_null: The specified column must not contain null (missing values)relationships: Whether there is a common column between the specified tables (referential integrity ). The specified column will be the foreign key.Filedspecifies a column,torefers to the column in the table specified by , and checks the consistency of the column.accepted_values: Tests that the column value is one of the predefined values. For example, if a column only has the values "A" and "B", specify those values. (not used this time)
In subsequent chapters, we will use the above Genetic test to run tests.
Before genetic test
Before testing the models, we summarized the corresponding genetic tests and columns for each model.
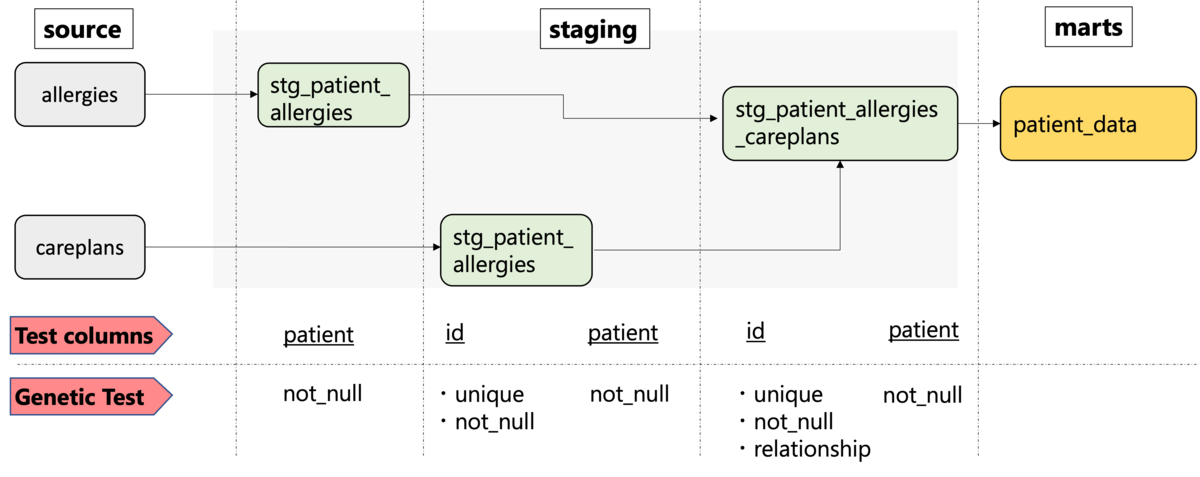
Since we want to test all pipelines this time, we will test all child models of marts model.
First, test for missing values in the columns stg_patient_allergies of the model . Next, we test if the columns in the model have no missing values and are unique, and if the columns have missing values. Finally, the model's id column is tested for unique and not_null, and the model's id column is referenced to test consistency. Also test for not_null on the column.patient
stg_patient_careplansidpatient
stg_patient_allergies_careplansstg_patient_careplans
patient
We will run the test using the model created so far, but the code for creating the model is also shown here. Please refer to the previous article for preparation of source data by Partner Connect.
patient.allergies A model extracted from the source data .
The column to be tested is patient.
with source_data as (
    select *
    from {{ source('patient', 'allergies')}}
)
, renamed_data as (
    select cast(START as date)      as start_date
    , cast(STOP as date)            as stop_date
    , case when PATIENT like '%-%'
            then left(PATIENT, 8)
            else PATIENT
        end                         as patient
    , case when ENCOUNTER like '%-%'
            then left(ENCOUNTER, 8)
            else ENCOUNTER
        end                         as encounter
    , CODE                          as code
    , DESCRIPTION                   as description_allergiess
    from source_data
)
patient.careplans A model extracted from the source data .
The columns to be tested are id and patient.
with source_data as (
   select *
     from {{ source('patient', 'careplans') }}
)

, renamed_data as (
    select case when Id like '%-%'
        then left(Id, 8)
        else Id
      end                           as id
    , cast(START as date)           as start_date
    , cast(STOP as date)            as stop_date
    , case when PATIENT like '%-%'
        then left(PATIENT, 8)
        else PATIENT
      end                           as patient
    , case when ENCOUNTER like '%-%'
        then left(ENCOUNTER, 8)
        else ENCOUNTER
      end  as encounter
    , CODE                          as code
    , DESCRIPTION                   as description_careplans
    from source_data
)
join This model is derived from the above two models .
The columns to be tested are also id and patient.
with patient_allergies as (
  select *
    from {{ ref('stg_patient_allergies') }}
)


, patient_careplans as (
  select distinct id
  , start_date
  , patient
  , code
  , description_careplans
    from {{ ref('stg_patient_careplans') }}
)

, patient_allergies_careplans as (
    select patient_careplans.id
    , patient_allergies.start_date
    , patient_allergies.patient
    , patient_allergies.code as allergies_code
    , patient_careplans.code as careplans_code
    , patient_allergies.description_allergiess
    , patient_careplans.description_careplans
    from patient_allergies
    inner join patient_careplans
    on patient_allergies.patient = patient_careplans.patient
)
model test
To test the model, .yml write the contents of the test in a file.
models/staging/patient Create a new file in the directory stg_patient.yml and write test code for these models.
version: 2

models:
  - name: stg_patient_allergies
    description: staging model that includes records of patient's allergies information
    columns:
      - name: patient
        description: not null patint id for each patient's allergies
        tests:
          - not_null

  - name: stg_patient_careplans
    description: staging model that includes records of patient's careplans information
    columns:
      - name: id
        description: unique & not null careplans id for patinet's careplans
        tests:
          - unique
          - not_null
      - name: patient
        description: not null patint id for each patient's careplans
        tests:
          - not_null

  - name: stg_patient_allergies_careplans
    description: staging model that combines records of allergies and care plans information
    columns:
      - name: id
        tests:
          - not_null
          - unique
          - relationships:
              to: ref('stg_patient_careplans')
              field: patient
      - name: patient
        description: not null patient id for patient's careplans
        tests:
          - not_null
.yml I will explain the configuration of the test code shown in this file. After specifying the column name next to the model name so that the will come below, the flow will be to write the contents of the genetic test to be executed
name. Below are the parameters for each test code .columns
name: Specify the materialized model as a table.
columns: Sets the column description and test to run. : Enter
description: the model description, column description, and test details in the parameters .test
Now it's time to run the tests.
This time, we will run the test against the finally created patient_data model.
The patient_data.sql model was created in the previous article as follows.
{{
 config(
   materialized = "table",
   tags=["patient"]
 )
}}

with patient_data as (
  select *
    from {{ ref('stg_patient_allergies_careplans') }}
)

, risk_pred_data as (
    select id
    , patient
    , count(distinct allergies_code) as number_of_allergiess
    , count(distinct careplans_code) as number_of_careplans
    from patient_data
    group by 1, 2
    order by  number_of_allergiess desc, number_of_careplans desc
)
Enter commands to run the tests in the console. Enter the test command as Enter when testing with dbt , but you can test only the specified model by specifying after . Additionally, prefixing the model name with a symbol selects and tests all of that model's parent models. This means that you will be testing all three models that are parent models. Conversely, if the symbol is placed at the end of a model, it selects all child models of that model, so you can test all child models by specifying a parent model that is closer to the source data .dbt test --select +patient_data
dbt test--select model name
+
patient_data
+
+ If you want to know more about the difference in the test depending on the position of the symbol, please refer to this.
Below is the content of the command:
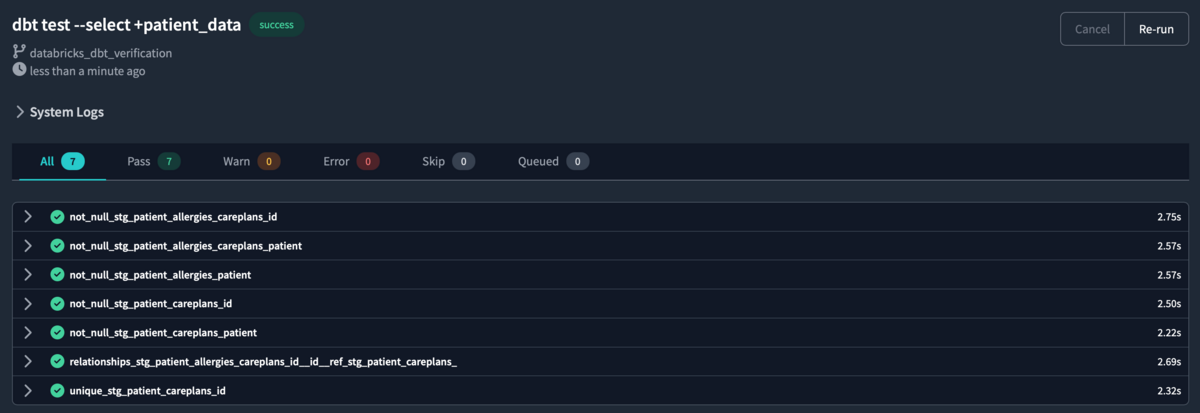
The test results show the models tested and the time taken for each. Models that pass the test will have a green check mark next to the model name, otherwise a red check mark will appear. Since all model names are checked, the test of the entire pipeline was successful.
Since the test was successful, we will finish by writing the documentation for this project. Creating documents is important when considering the organization and sharing of created models.
You can create a document dbt docs generate with a command, and after executing it, click View docs (book icon) on the upper left of the screen to launch the document site in a new tab.
You can search for the model you tested earlier by entering the model name in the search bar on the screen.
If you enter stg_patient as a trial, model candidates will be displayed.
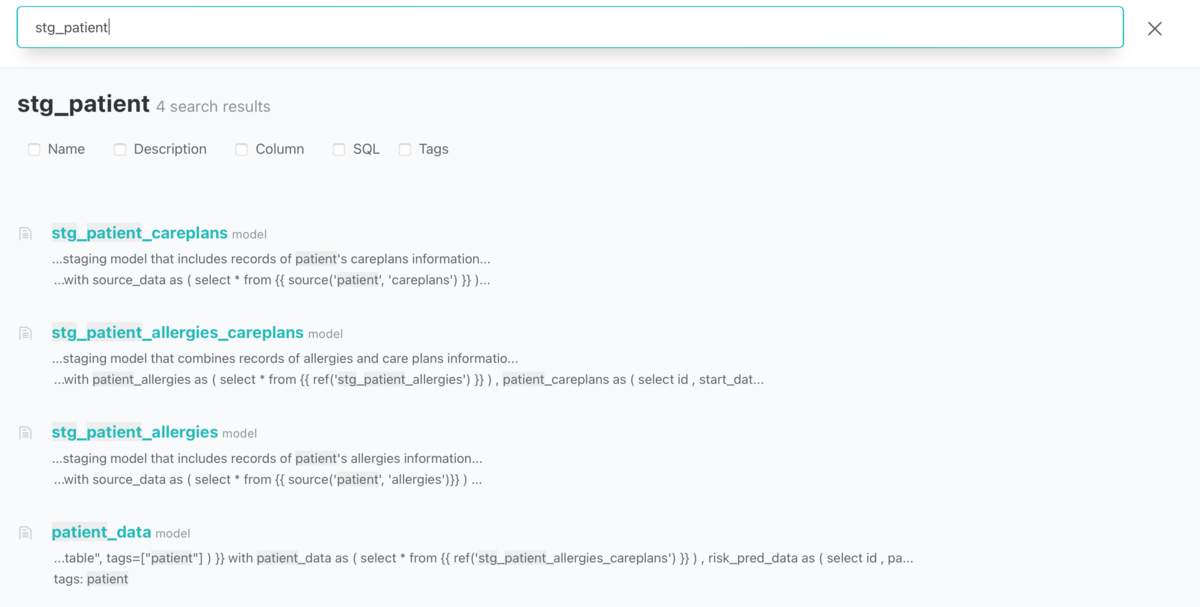
First, stg_patient_careplans let's look at the model.
You can check the DESCRIPTION and TESTS columns written in the test code to the right of the column names and data types.
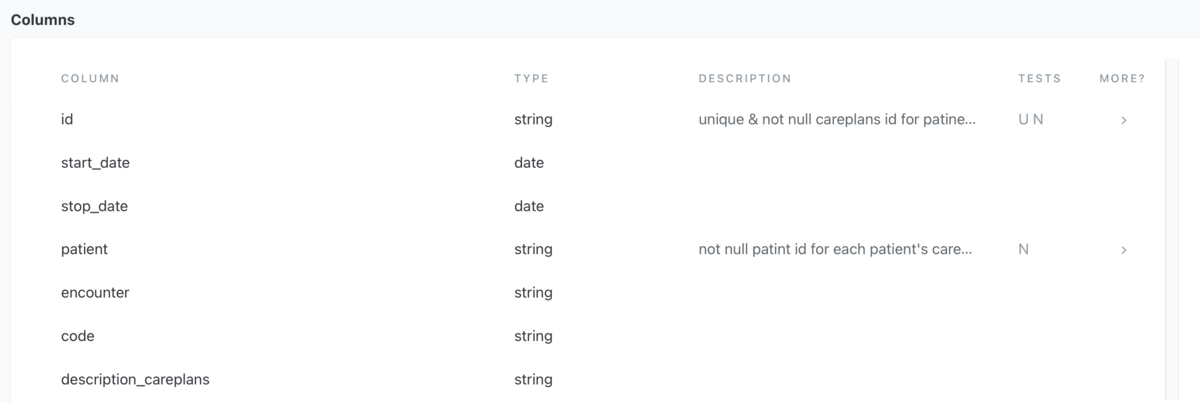
The letters written in the TESTS column are the abbreviations of the patterns of genetic tests that were performed.
- N: Not null
- U: Unique
- F: Foreign key
stg_patient_allergies_careplans for the model
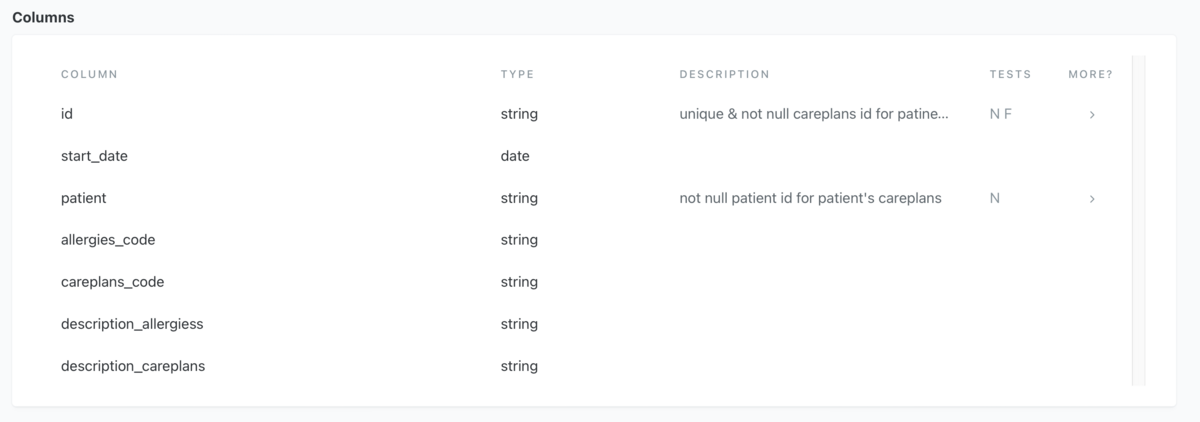
You can see that the id column is a foreign key.
Also check the lineage graph. It can be displayed by clicking the graph icon at the bottom right of the screen.

I was able to confirm the content of the test that was performed by checking the document.
Reference article
Conclusion
In this article, we ran the test against the model created in the previous article and confirmed the details of the test on the documentation site.
Although I didn't mention it this time, dbt_utils various genetic tests are also prepared in the package, so that it can correspond to the target test. Next time, I would like to explain the deployment of the model.
I would like to continue to post verification content related to Databricks in the future, so please take a look at it again.
We provide a wide range of support, from the introduction of a data analysis platform using Databricks to support for in-house production. If you are interested, please contact us.
In addition, we have completed a sales partner agreement with dbt Labs, Inc., which enables us to sell dbt and provide installation support.
We are also looking for people to work with us! We look forward to hearing from anyone who is interested in APC.
Translated by Johann